How To: Make Your Selfies Look Professional with This Simple Lighting Adjustment Trick in Photoshop Express
Picture this: You finally get that awesome angle, the perfect selfie. You can't wait to post it on your Instagram, except there's one problem — it looks a little flat and the colors just seem off. Maybe it's the lights? Or maybe your new smartphone camera isn't as good as you thought? How are your friends getting those beautiful photos they've been posting on social media?The answer is simple: editing. Unless you've got perfect lighting conditions, your iPhone or Android phone likely won't take the shot you envisioned — especially if you're using the front-facing camera. But you can achieve a professional-looking photo by making a few simple lighting adjustments with Adobe Photoshop Express, available on iOS and Android.
Step 1: Take a Photo with Decent LightingThe lighting for your selfie doesn't have to be perfect, just lit well enough to capture all of your facial features. Unless you're snapping the image with zero artificial or natural light, it shouldn't be hard to do. While you can still make some improvements on a photo that's pretty dark, you'll have a difficult time achieving the full effect of this adjustment.Also, make sure your photo remains unfiltered. You'll be able to add any desired filters after this adjustment is complete, whether in Photoshop Express, Instagram, VSCO, or another photo-editing app that has filters.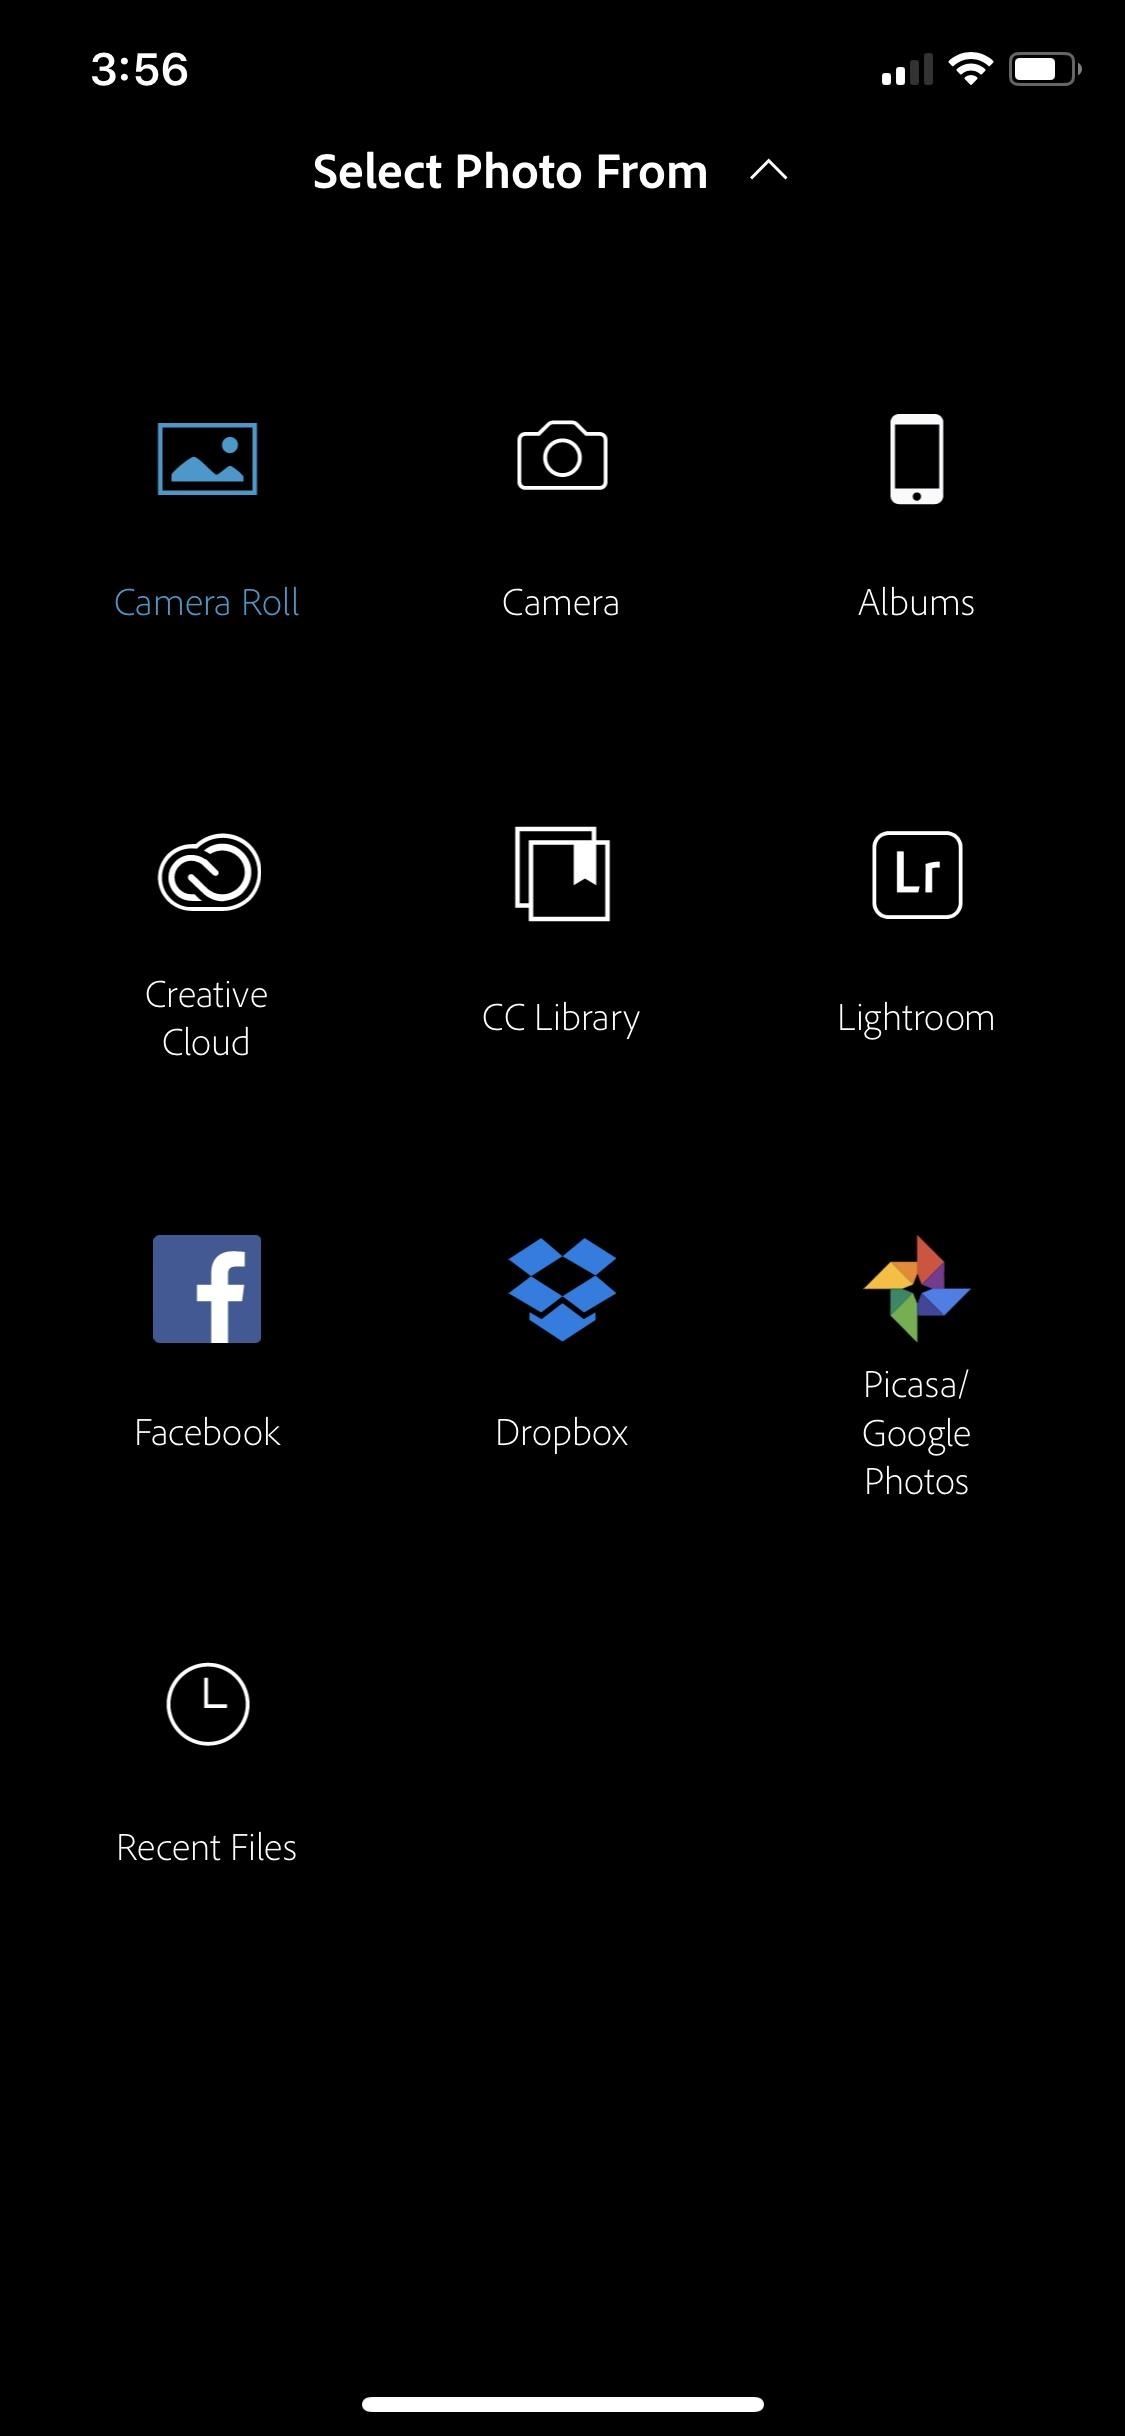
Step 2: Select Your Photo in Photoshop ExpressWhen you open Photoshop Express, you'll see the photo selection screen right away unless you were recently using the app. If that's the case, hit the back arrow (iOS) or "X" symbol (Android) in the top left, which should return you to the photo selector. The app is set up to allow you to select a photo directly from your device's main photo gallery by default.If you tap the drop-down arrow next to "Camera Roll" (iOS) or "All Photos" (Android) at the top, you can select a different place from which you're importing. On iOS, you can choose from Facebook, Dropbox, or Google Photos. On both iOS and Android, you can take a photo with your camera or choose a photo from any albums on your device, as well as from Lightroom, Creative Cloud, and CC Library. Options on iOS (left) and Android (right). Adobe allows you to connect all of its products through what they call the Creative Cloud, two of the options just mentioned. That means anything uploaded on to your cloud from any Adobe app can be accessed from a full Adobe product on your computer or mobile devices. However, though Photoshop Express is free, the Creative Cloud Library comes with a paid subscription through Adobe.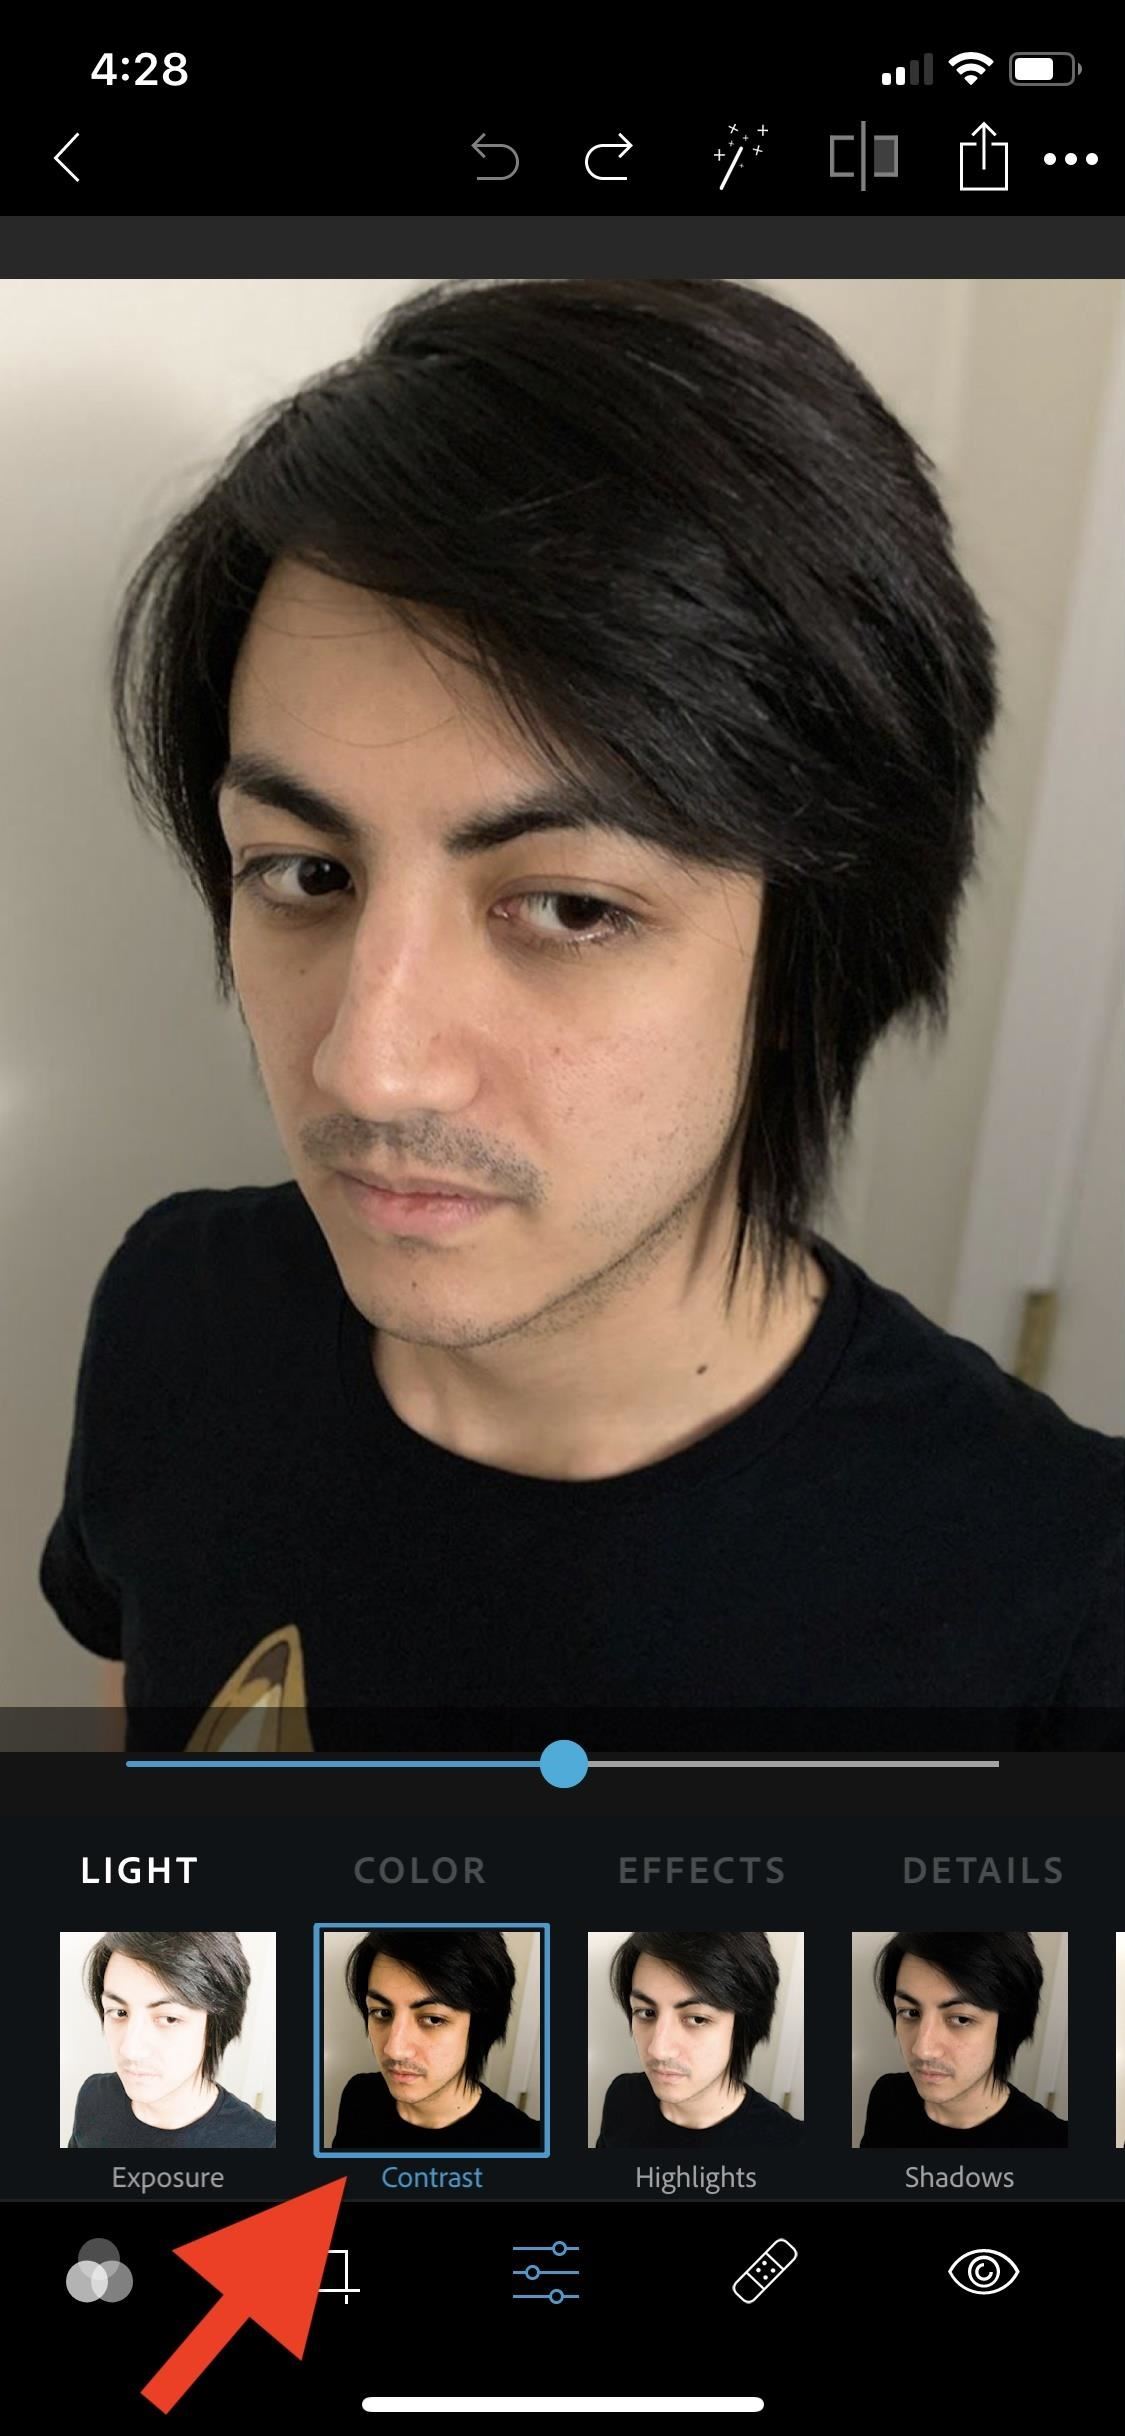
Step 3: Adjust the ContrastOnce you've selected your photo, select the adjustments tool icon (three sliding bars on iOS, two on Android) in the toolbar at the bottom. First, tap the "Contrast" option, which allows you to make adjustments to the tone range of an image. Contrast is basically the difference in brightness between the light and dark areas, determining the number of shades seen.Slide this bar to the right to increase the contrast, which will bring out the darker tones. You can also choose to slide the bar left if that's the look you're going for. This will decrease the darker tones, leaving you with a more vintage look.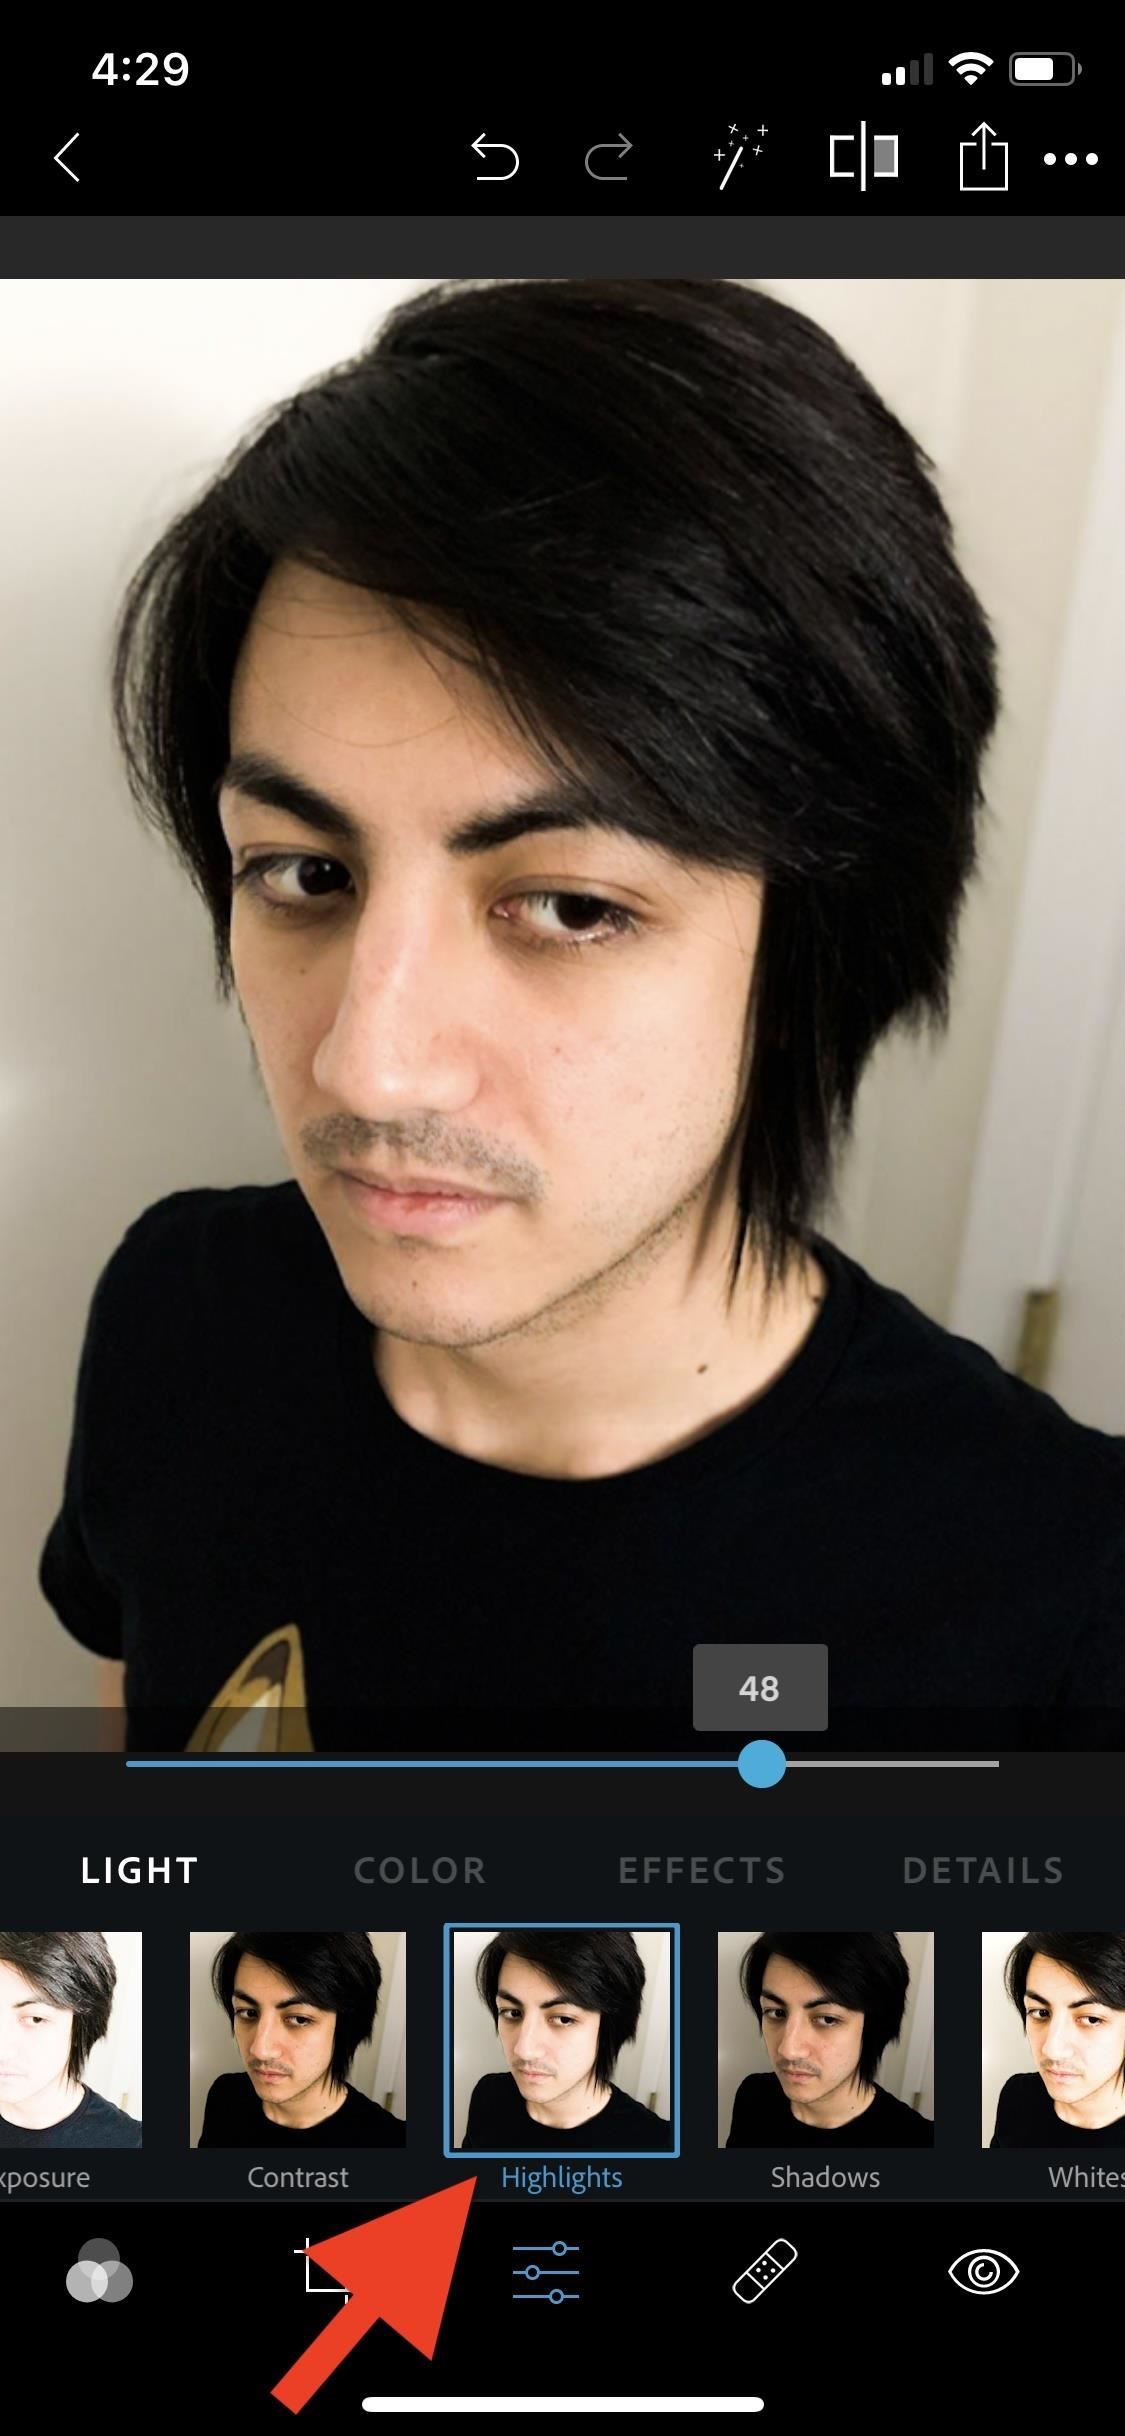
Step 4: Adjust the Highlights & ShadowsNext, we'll use the "Highlights" and "Shadows" options, located directly next to each other. These two adjustment commands work together to balance out the lighting in the foreground and background of the image, in our case, to help the subject stand out in a selfie.These two tools aren't just for lightening and darkening the whole image, they actually look at the surrounding pixels (or "local neighborhood") of the highlights and shadows that are visible. When you adjust the levels of highlights and shadows, there's some major behind-the-scenes work going on.If the highlights and shadows on your selfie are either too light or too dark, adjust each tool's slider until the light and dark parts of the image are more balanced. It's not an exact science, just eyeball it.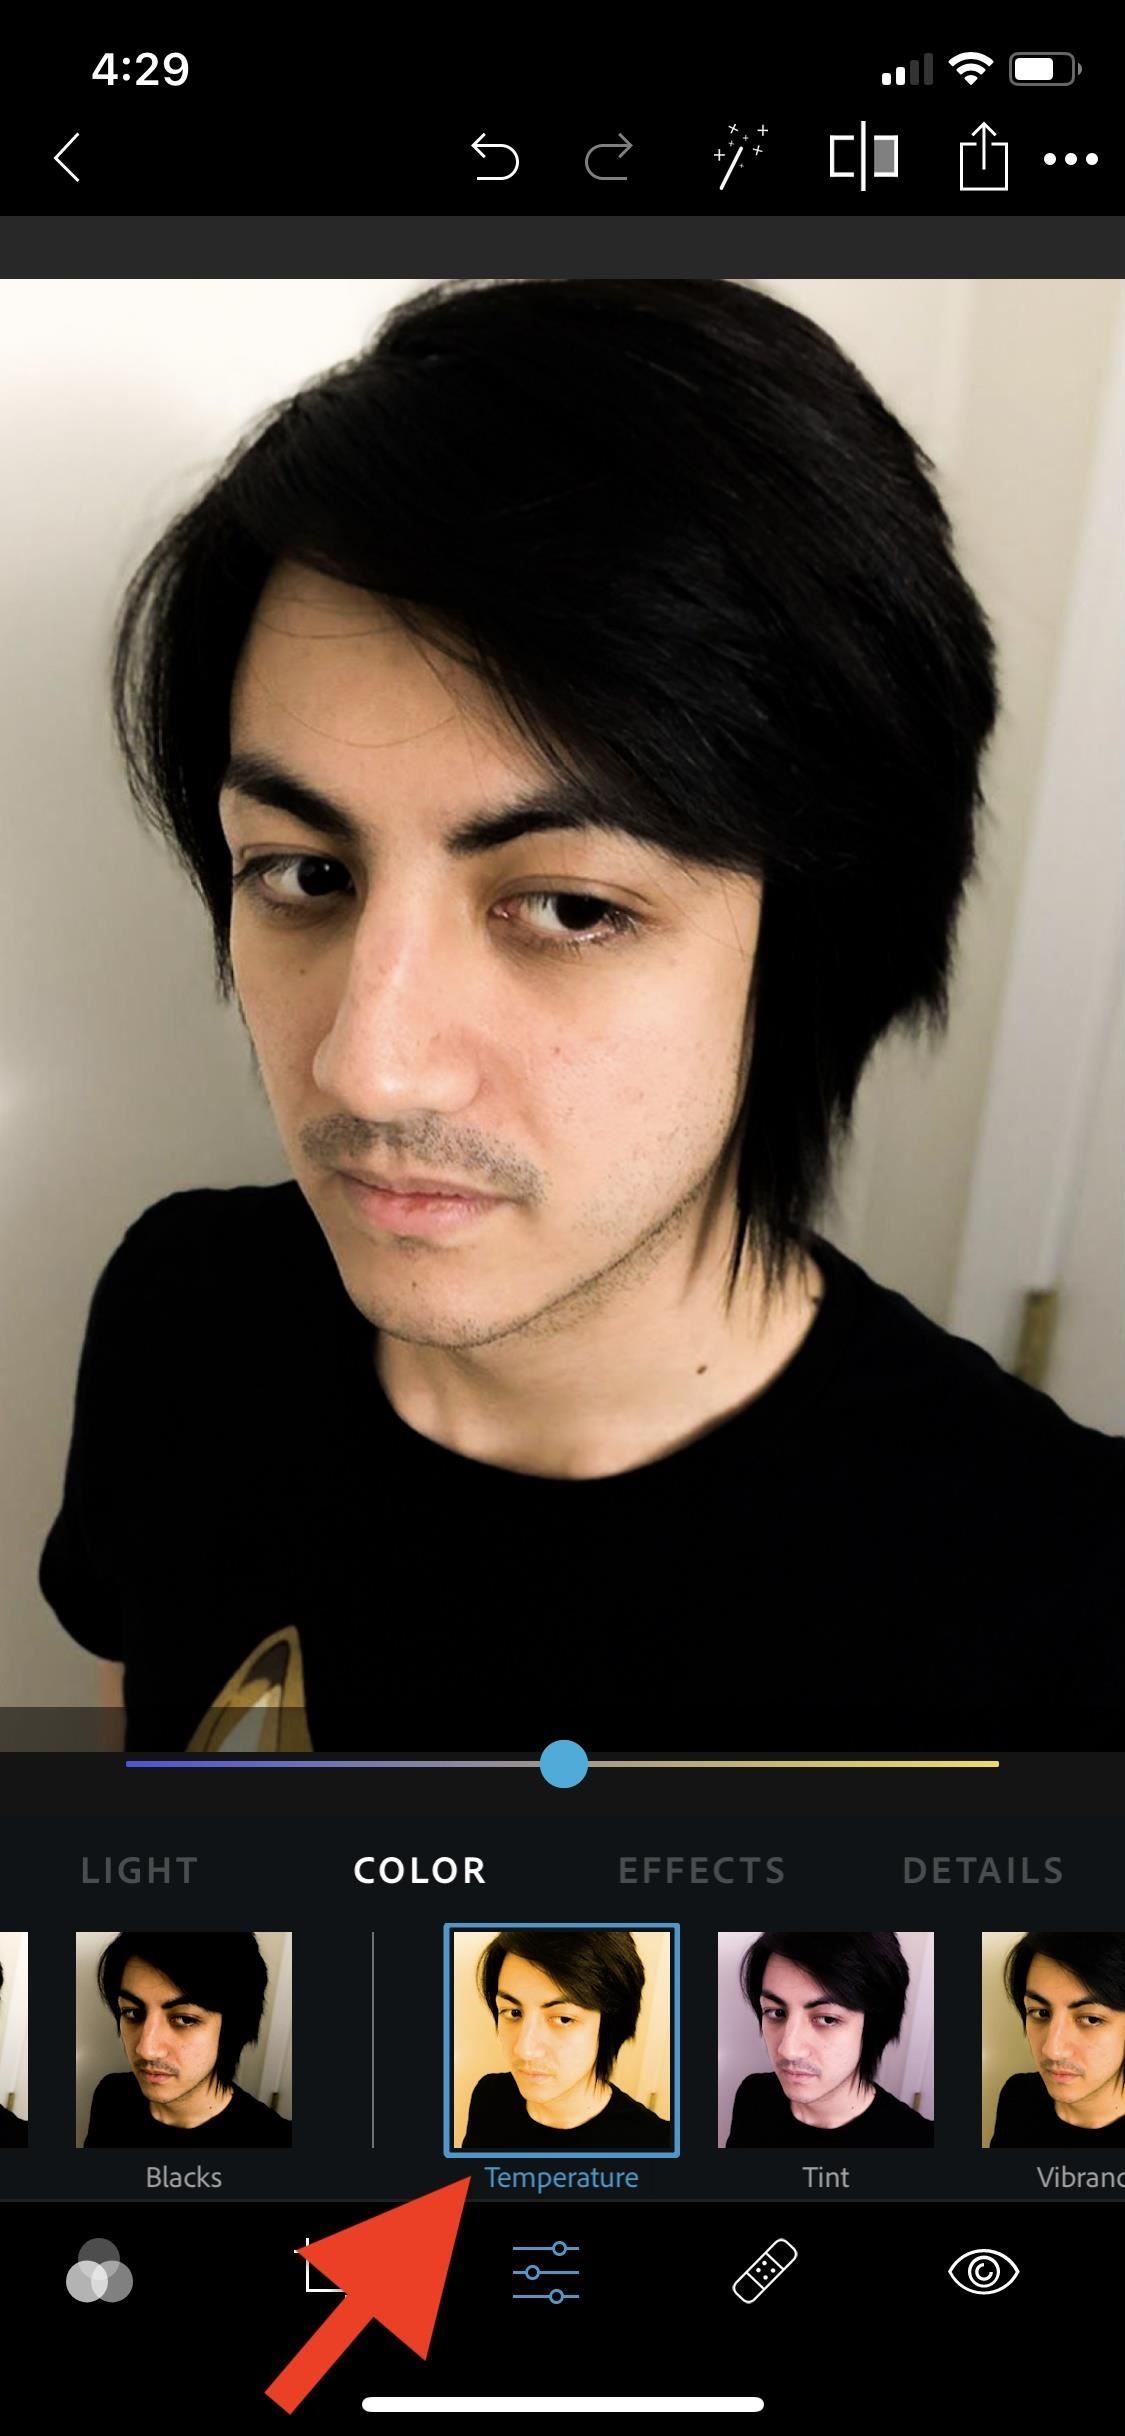
Step 5: Adjust the TemperatureFinally, scroll right to find the "Temperature" option. This command changes the color of your image by introducing either warm tones or cool tones. Depending on the photo, this bar will be adjusted differently to achieve a more neutral tone. In my example, the temperature was modified to be slightly cooler. You may need to adjust your bars to different degrees based on the type of lighting the selfie was shot in.
Step 6: Readjust Them if NeededAfter completing all of the adjustments, you can still go back and play with each of the options mentioned until you're 100% satisfied with your results.Don't Miss: Save Time on Quick Adjustment Edits with Filters in PS Express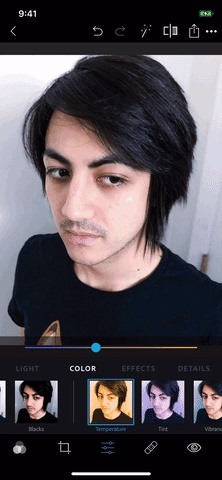
Step 7: Check & SaveTo check your edits, tap the tool up top that looks like a square chopped in half. This is the before-and-after tool and will toggle between your original image and your edited image. It's a good way to see all that you accomplished, as well as help determine if more fine-tuning is necessary.Once you've decided you're finished, there are two different way in which you can save your edited selfie. Your first option is to select the back arrow (iOS) or "X" (Android) in the top left. You'll see a pop-up menu to either "Save" or "Don't Save." Either way, you'll be taken back to the image selection screen.The second option is to tap the share icon next to the before-and-after tool. From here, you can decide where you want to save the image. You can choose your camera roll, upload to social media, send to a different Adobe product, or send it in a message. From this screen, you can also change the size and quality of your selfie before saving by tapping the appropriate items below the image preview. GIFs are highly compressed, so it looks a little overexposed here. Don't Miss: Use Canva's Mobile App to Create Professional-Looking Graphic Designs FastFollow Gadget Hacks on Pinterest, Reddit, Twitter, YouTube, and Flipboard Sign up for Gadget Hacks' daily newsletter or weekly Android and iOS updates Follow WonderHowTo on Facebook, Twitter, Pinterest, and Flipboard
Cover image, screenshots, and GIF by Courtney Raphael/Gadget Hacks
How to Root Your OnePlus 6 with Magisk — A Beginner's Guide
How To: Customize the Windows 10 Lock Screen How To: Get Back Lock Screen Customization in Android Lollipop How To: Customize Your Android Lock Screen with New Unlock Effects & Customizations How To: Make App Shortcuts on Your Galaxy Note 2's Lock Screen Adapt to Your Routine
If you have a rooted Samsung Galaxy S6 and now you want to unroot it or want to return back to the stock room then you are in the right place.Here is will show you step by step Guide on How to Unroot & Restore Samsung Galaxy S6 Back to Stock
How to Unroot and Completely Restore Back Samsung Galaxy
Make a PDA Stylus-Pen: I like to use a HP iPAQ PDA, but I often lose the stylus. This instructable will show how to make a new PDA stylus out of a bamboo chopstick, and also how to insert a short ballpoint pen into it.
Make a premium DIY stylus in 1.5 minutes!! for tablet/phones
how to make your own live wallpaper in this video i will teach you anyone can make or create a live wallpaper without any extra skill full skills in this video i will teach you how you can make
How to Create Your Own Android Live Wallpaper App | DroidViews
How to Be A Good Owner For A Mute Furby. Furbys becoming mute is a common problem. This happens when your Furby's speaker is broken, disconnected, or missing. If this happens to you, you can replace the speaker, but that takes a lot of
Make A USB Furby - Metacafe
Set the alarm on your iPhone. Open the Apple Watch app on your iPhone. Tap My Watch, tap Clock, then turn on Push Alerts from iPhone. The alarm on your Apple Watch is separate from the alarms on your iPhone. When you set an alarm, make sure that your Apple Watch and your iPhone aren't in silent mode. To set or adjust an alarm for Nightstand
If you've always wanted to create a cohesive Instagram feed, this guide is for you. I'm going to tell you all my secrets on to improve your feed and grow your Instagram. I'm going to cover everything: from how to make a visually cohesive Instagram theme, to knowing what to post and how to choose the perfect filter.
App automatically 'Likes' your friends' Instagram photos - CNET
Get the most out of your HTC Desire HD! This guide offers a software tour of the Desire HD Google Android smartphone, which features a 4.3" display. Android novice? Not a problem. This exhaustive, eleven-minute guide will teach you everything you need to know. Become an Android pro with this video
Electronic ringtones for HTC Desire HD download free
How To Change Google Site Color & Images You can change Colors & Images of (Background, Header, Content, Sidebar, Footer) In the below Image we can see with arrow 4 Parts of Sites.
How to Highlight text in Google Docs? Change Text background
Apple Releases iOS 12.3 Beta 5 for iPhone to Developers
How To: Move the Obtrusive Volume Indicator Box to Your
iCloud is built into every Apple device. All your photos, files, notes, and more are safe and available wherever you are, and it works automatically.
Osas Obaiza's Profile « Wonder How To
0 comments:
Post a Comment